¶ Annealing
Annealing is the practice of heating and then cooling a material in order to change its physical characteristics. Annealing metal makes it softer and less brittle. Annealing plastic makes it tougher and sometimes improves heat resistance.
Probably the best (and possibly the only) large scale experiment on annealing 3d printed objects was performed by Prusa Research in 2019. It covers four material types and goes into greater detail than our blurb above, and it's a good read: https://blog.prusaprinters.org/how-to-improve-your-3d-prints-with-annealing_31088/
Unfortunately this is only effective with simple objects. Complex objects will warp and deform too much for this to be an effective treatment.
¶ The Quick Guide to Annealing
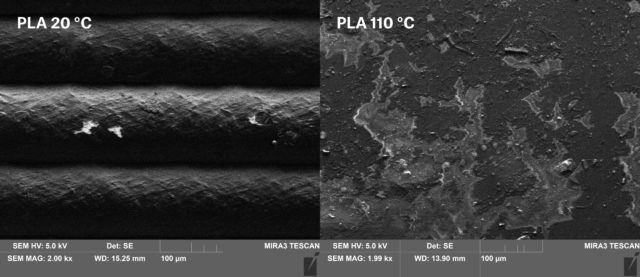
As any experienced printer knows, 3d printing builds an object layer by layer. And that process results in parts with markedly different properties on the Z axis compared to the X and Y. Zoom in close enough on even the finest of print settings and you'll see stress inducing layer lines instead of the amorphous structure you'd get with injection molding.

Injection molding will always have the edge here, but by slowly heating and then cooling a 3d printed part it can be made better. It can also melt into an amorphous blob and not all materials have a sweet spot where strength increases noticeably but the part hasn't deformed too much.
There's a lot of slack in this process so all numbers, and even some steps, should be treated as guidelines.
¶ How To Do It
You will need:
- An oven (a regular kitchen oven will work provided it's electric and not gas)
- A baking tray that you don't care about damaging
- Hobby sand (ot other fine grain packing material that won't react with heat--ground up salt works)
- A 3d printed part made with 100% infill
Take your tray. Put a small layer of sand on the bottom. Put your item in the tray. Fill the tray up with sand and make sure the object is completely encased and any hollow areas filled. Heat oven to desired temperature. Place item into oven. Let sit for 1-2 hours. Turn off oven. Let sit until cool. Take out tray. Remove part. That's it.
The small layer of sand on the bottom is to prevent the tray from coming into contact with your print. The rest of the sand helps the object keep its shape and acts as insulation keeping the temperature more consistent. The long bake and cooldown times are because plastic doesn't absorb heat very well and we want the object as evenly heated as possible.
¶ Recommended Temperatures
| Material | Temps | Notes |
|---|---|---|
| PLA | 90°C/194°F | Dramatic increase in heat deflection, significant deformation |
| ABS | 100°C/210°F | Poor gains, generally not worth annealing |
| PETG | 110°C/230°F | Good general all around gains |
| Nylon | 130°C-140°C/266°F-284°F | White nylon will turn yellow, big improvement in heat deflection |
| PolyCarbonate | 120°C-130°C/248°F-266°F |
Hard numbers for nylon and PolyCarbonate are scarce. No tests are known to have been conducted with advanced filaments such as glass filled nylon or carbon fiber mixes.
¶ Managing Deformation
The hotter you anneal the stronger the part. And the more it will deform. You can expect a part to shrink by a few percent in the X and Y dimensions and grow a little bit in the Z. For some parts this is acceptable or can be dealt with in post-processing; for other parts you'll want to print and anneal some test objects, measure them to see what the level of change is, and then print new ones scaled to take the deformations into account.
¶ What's it good for
In the realm of armaments, not much as dimensional tolerances tend to be strict. Baffles are at present the only notable exception.
¶ References
(1): [https://blog.prusaprinters.org/how-to-improve-your-3d-prints-with-annealing_31088/ Prusa research article]
(2): [https://rigid.ink/blogs/news/how-to-anneal-your-3d-prints-for-strength Rigid.ink article]